What's it all about?

This blog is about photography and photoediting. Its purpose is to provide hints and tips and links to interesting and useful resources for digital photographers, regardless of their level of expertise or experience. It is aimed at people who use digital SLR cameras and who process their images using the latest versions of Adobe Photoshop and Adobe Photoshop Lightroom.

The author of this blog is Glenn Springer and you can read more about him at his web portal at faczen.com. Information on workshops, and links to everything is at photography.to. Glenn's original blog, which is an ongoing journal of his photographic meanderings goes back to 2006 and contains many additional hints and tips, as well as representative images that he has made. Gallery quality prints are available through his Smugmug gallery site. It is an interesting place to visit to see a variety of quality images, as well as an ongoing general journal of photos going back several years.

Photography workshops are scheduled every few weeks starting in the Spring. For an overview of what's happening, please visit the photography.to website.

The most recent blog post is below. Scroll down to the bottom to see the list of previous postings or search for any particular topic.


Showing posts with label HDR. Show all posts

Wednesday, December 12, 2012

Auto ISO HDR Bracketing

This is about using auto-ISO to vary the exposure when shooting multiple exposures in burst mode for generating HDR's. It works.

First a disclaimer: I don't believe this works with Canon cameras, but not being a Canonista, I can't try it to find out. Perhaps one of my readers can test it and post a comment here.

As a second disclaimer, I've only tested this on the Nikon D600 but I have been informed that Auto-ISO has been available since the D200. Again, if someone has  a D200, D7000, etc., perhaps they might try it and let us all know.

Now a little background.

The 'accepted' way of doing HDR's is to bracket a number of exposures around what you choose as the nominal value, and blend them using one of a variety of programs, including Nik HDR Efex Pro (my favourite), Photomatix Pro, or HDR Pro inside Photoshop (CS4/5/6).

We are told that the camera should be on aperture priority (or manual, Nikon changes the shutter speed in manual, not the aperture) because when you blend images taken with different apertures, you introduce a lot of chromatic aberration and create difficulties aligning all elements of the image because of the changing depth of field. That doesn't mean you can't or shouldn't use a fixed shutter speed and vary the aperture: after all you're free to experiment however you wish and of course rules are made to be broken.

Here's the problem. Suppose you're shooting a scene handheld in aperture priority with a 200mm lens and you've chosen f/8 for maximum sharpness, and a nominal ISO of 400. On a given day, the nominal shutter speed might be 1/250 sec, let's say. That means that all other things being equal, your -2EV exposure will be at 1/1000 sec but your +2EV exposure will be at 1/60 sec. Your +2EV shot is going to exhibit camera shake, even if you have VR (Canon IS). So you can't really use those settings, you're going to have to bump the ISO up a couple of stops, or open the aperture.

But then you'll be bumping up against the fast limit of your shutter speed (1/2000? Varies from camera to camera).

This occurred to me while I was experimenting with auto-ISO, shooting a 400mm lens. I KNOW I can't shoot sharp pictures with that lens under 1/500 sec and fiddling with aperture under varying conditions was a pain, I really wanted to set that depth of field. So I thought, "change the ISO". It works.

With earlier cameras, there's a limit of how high you can go (ISO) without introducing unacceptable noise. Well, that's true on all cameras, but the D600 seems to handle it better and I've even had acceptable shots in certain conditions at ISO 6400! So I set about trying it and sure enough, it worked.

So why not try it when shooting bracketed for HDR?


This is an HDR generated in Nik HDR Efex Pro 2 from 3 exposures. They were all at f/6.3, 1/160 sec, focal length 70mm. The 3 shots were at ISO 400, 1400 and 6400. The sky was still featureless, so I brought it into CS6 and used Topaz Adjust 5 to further tone the image.

In this image, I achieved the effect I was going for. Yes, there's noise in the sky, mostly introduced by Topaz when I tried to get some detail in it. I did balance some sharpening and noise reduction in Lightroom 4 in the normal course of post processing it.

Here's another image:


This restaurant was across the street from the abandoned paddle shop above. In this case, the 3 exposures were 1/160@ f/8, ISO 1100, 1/250 at f/8 ISO 400 and 1/160 at f/8, ISO 4500. Why did the middle one (the -2EV shot) jump to 1/250 sec? I have no idea. Post-processing was much the same as the previous image, except I added a vignette in Lightroom. 

Another feature in the D600, and again I'm not sure about other models, is the ability to set the minimum shutter speed when you turn auto-ISO on. You can also set that to "Auto", which keys the minimum shutter speed to the focal length of the lens (you can shoot slower with a shorter lens without introducing visible camera shake).

I've read here and there, that you shouldn't use high ISO when doing HDR blends. Probably true, but sometimes it's better to trade off high noise for increased depth of field and a faster shutter speed. It's your call.

Do I feel as though I'm using too many auto settings? Am I going back to being an amateur snapshooter? Not at all. If the Gods (I mean Nikon) didn't want high end shooters to have these capabilities, they wouldn't have built them into the D600. Furthermore, I'm making all the decisions: in this case I just want to limit the shutter speed and let the camera make changes to other settings on the fly, without having to worry about bumping up against traditional limits. I'll do more of these. Count on it.

Tuesday, December 6, 2011

Comparing HDR Programs

I posted this also on the NAPP forums.  I got interested in the different results you get from different programs. I've done these comparisons before, trying to decide which program I like better but I've concluded that it depends on the image.

That said, up to now Photomatix has been my first choice but these results may change that.

The goal here was to produce the image that I liked best in all three programs. I did not look at the other images while working in any program, with the exception that I knew I really wanted colourful skies when I got to the third one (P'matix). And I was not trying to MATCH the images.

Workflow:
was to select all 5 source images (bracketed burst, 1 stop apart, RAW. I open them in the HDR program, then look through the thumbnail presets for the one closest to what I want, then I modify it with sliders until I had done the best I could. I then saved the files and exported them to CS5 for further tweaking.

Once open in CS5 I created a new layer and ran a hi-pass filter. I adjusted the image with curves, then I ran DFine 2.0, sky preset which I masked back in. Next I ran Viveza 2 to increase the saturation in the sky (except the CS5 one where I had to REDUCE the saturation overall).

Back to Lightroom where I tweaked a little and synced the cropping and metadata. I then exported each one as a 720 px-wide jpg for posting here.
Here are the images:

1. Processed in Photoshop CS5 HDR Pro


2. Processed with Nik HDR Efex Pro


3. Processed with Photomatix HDR Pro 4


Now remember, I was not trying to MATCH the images, just to do the best I could with a pleasant image.

Comments:
1. On first look, CS5 HDR Pro produced a very pleasing image with lots of detail and saturation, with the least amount of effort and fiddling. But the saturation came in way too high and there's very visible chromatic aberration.

2. Nik HDR Efex Pro gave me a really clean image but there was almost no colour in the clouds until i ran Viveza. Again there was some evidence of chromatic aberration but I thought the image was much smoother overall. This program gave me much more range doing details than the other two. I should take out a little colour bias from this image but didn't notice until I was posting this.

3. I maxed out almost all the controls in Photomatix and still couldn't get the kind of detail and sharpness I liked and again, there was no colour in the clouds. A small hue/saturation adjustment in Photoshop gave me all the colour I wanted but really bad artifacting so I backed it out. Microsmoothing helped a lot with the noise in the sky. There was NO evidence of chromatic aberration even when I viewed the image at 200%. I ended up with lots of Halo around the trees, though.

Conclusion:
Until I actually looked at all 3 images together, I didn't know which one I preferred. I'm not going to tell you, though, because that's subjective (well this whole thing is subjective!) and you may have a different preference. CS5 was the easiest one to use. Nik had the broadest range and lots of room left to play. Photomatix was maxed out but gave the cleanest result.

I know this is a silly comparison, using just one image and subjective rather than objective adjustments and inconsistent treatment. So please file it under "For What it's Worth".

— 30 —

Sunday, April 3, 2011

Using HDR for interior (architectural) shots

I had my bathroom renovated and thought I would take a few pictures as the work progressed. I did, and you can see some of the steps on my Journal blog at http://www.faczen.blogspot.com/. Search for “renovation”. When it was all done, I wanted to take a shot that would show how nice the room looks now. And in the process, I realized that this was the perfect opportunity to use HDR.

In this writeup, I’m going to go through the main steps that took me from an ordinary photo to an image that I think captures the essence of the renovated room (OK, I know it’s a bathroom, and the ‘essence’ is not what we normally want to experience, but you know what I mean!).

The purpose is to show you some of the things you may want to do when creating an HDR, and a few other techniques for post-processing thrown in. Is this a step-by-step tutorial? No. My goal is to make you think about some of the steps you could take to create a final image and maybe to give you some ideas.

If you've been following my Journal blog, and especially if you're a member of the award winning Richmond Hill Camera Club (congratulations to all on winning the Stu Freedman Trophy at the Greater Toronto Council of Camera Clubs competition this year -- without my help this time! LOL), you would know that I created a presentation on HDR for the Imaging Conference, and I promised to convert it to a blog post. THIS IS NOT IT. But it will tie in nicely when I get it finished!

Is this a really great image? Nah. But infinitely better than the original!

Step 1: Visualization

I wanted to show the textures in the wood, capture the warmth of the lights (an aside here. There’s daylight from a window behind me. I didn’t think it would be enough. Also, the lights are not warm at all: I bought 6500K – daylight – bulbs and should not have. I’ll get some warmer ones and use these in my computer workstation area), and the really great colours of that towel hanging on the door. There are deep shadows on the front and sides of the vanity that I wanted to penetrate.


Step 2: Exposure

The front of the vanity is the darkest area in which I want to capture detail, so it needs to be in Zone III or more. So if I set the wall on the right as Zone V, I should be close. I had the ISO cranked ‘way up at 3200 and the aperture at f/4: as wide as it would go on the 12-24mm lens. I was hand-held – no room for a tripod – I was squeezed up against the wall in the bathtub. In the end, the lightest exposure was at 1/50 second. So I set the camera to 1/200 second in Manual mode, set the D300 to do 5 exposures ranging from -2EV to +2EV and banged off 5 frames in high speed mode.


Step 3: Merge to HDR

I have several programs I can use to do this. I chose this time to use Photomatix 4, directly from Lightroom. This image shows the workflow:


Now just sit back and wait for Photomatix to do its thing. There are a couple of choices you have to make, depending on if you were handheld or on a tripod (aligning the images) or if there was anything moving in the image (remove ghosting) but basically, just hit go.

Step 4: Toning the image

Photomatix is going to present you with some presets to look through. You’re not looking for the one that gives you your final image, you’re looking for the one that takes you closest. You’re going to be tweaking from there. In this case, I thought the “grunge” setting was the closest, although I really wasn’t looking for a rough image. Now you start playing with the sliders on the left. The first thing I did was to cycle through the five smoothing settings and in this case, I thought the most pleasing one was the middle one. The picture looks too grainy and bright for me, though


So I brought the Gamma up, added a little extra saturation and got rid of some of the grain and noise by adjusting the four smoothness controls. The critical one is the ‘Micro-smoothing’ but I didn’t want to crank it all the way up because you compromise apparent sharpness that way. When you’re done, hit “Save and Re-import” and your image will show up in the appropriate folder in Lightroom.

Step 5: Post-production

Well technically step 4 was post-production too, but we still have more to do. You could do some colour balancing adjustments, tweak the exposure, change the noise reduction and sharpness, all that good stuff in Lightroom now, but I wanted to do something else first, for which I had to go to Photoshop. So I did. Since I hadn’t done anything in Lightroom yet, I chose “Edit Original” when presented with that choice.

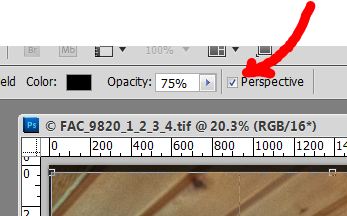
First Things First. I shot with a 12mm lens at an angle, so stuff is distorted. If you straighten the image to make the edge of the medicine cabinet on the left vertical, then the wall on the right is way off. That’s what you use “Perspective cropping” for.

Select the crop tool, clear any presets, then drag to select most of the image. You’ll get a different menu bar at the top when you do, and you’re going to want to select the “Perspective” tickbox as shown.


Now drag the bottom corners of your selection until the edges align with the features you want to be vertical. You may have to play with this a bit. If it doesn’t come out the way you expected, just step back in the history and try again. Photoshop will now create a rectangular image from your selection. If you used to use a view camera with a tilt lens, this is a similar effect. Click in the image to confirm. Magic!


Note that I could have levelled the image here too, but I like the way Lightroom does that, so I saved it for later. OK, what else? There was quite a bit of colour variation across the image. So I used hue/saturation adjustment layers with appropriate masking to vary the colours.I didn’t want the toilet paper roll in the lower right corner, so I used content aware fill to get rid of it. It didn’t work right away, so I had to take it, and the right wall, to a new layer and work there without distraction from other things in the image.

Since I’m really a fan of Topaz Adjust, I opened a duplicate layer with it and used just a little bit of adjustment – in this case I chose the “simplify” preset as a starting point, to smooth the image more. I added a little extra saturation and noise reduction too. Back in Photoshop, I copied the colourful towel to a fresh layer and boosted the saturation. The lights above the medicine cabinet were completely blown out. I copied them to a fresh layer and used the burn and dodge tools to give them a better look with a hot spot in the middle where the bulbs themselves are. There was still too much green in the image so I did a levels adjustment on the green colour channel.


Back to Lightroom. A little tweaking, crop to 8x10 proportion and we’re done. Here’s the final image:


The total time taken to process this image was about 30 minutes. It took me a lot longer to do it again with screen captures, etc so that I could write this up! One thing that amazes me is the lack of apparent noise, given that the camera was set for ISO 3200! And by the way, this was a small room: the width you’re looking at is only 6 feet and the camera was less than 8 feet from the door in the picture. Love that wide angle lens!

– 30 –

Tuesday, March 22, 2011

HDR: is it here to stay?

I think so. In anticipation of an upcoming sequence of articles on HDR techniques, I offer the following thoughts, which I wrote for another blog I read. There were passionate comments from both sides, which evoked the following response from me.
People certainly are polarized when it comes to HDR. Either they love it or they hate it, and within those camps there are those who disparage anything not realistic and others who are captivated by the surrealistic or more extreme treatments.

In my humble opinion, the HDR concept is a valid approach to rendering an artist's (a photographer or pixel manipulator can be an artist) vision. The current software offerings have made creating HDR images available to the masses. There will be good ones and there will be bad ones and there will be ones you like and others you dislike.

An almost perfect analogue is typography. Everybody and his brother (or sister) who has MS Word has the tools to be a typographer. How few of them have the vision.

Ansel Adams was doing HDR's in 1939. He compressed 7 or 8 zones of light values into the 5 or so that could be reproduced on paper. Are there those who don't appreciate or like his work? Undoubtedly. Do some people think his technique was flawed? Sure. Does anyone doubt for a moment that he saw through an artist's eyes? I don't believe so.

Can one criticize technique? Absolutely. But is it fair to criticize an artist's vision?

HDR is just a medium. An art form. HDR is to digital photography as oil or chalk-and-charcoal is to painting. I for one enjoy seeing the results when a real artist creates an HDR image. And I'm going to keep trying too. One day, maybe, some of my images will match what I see inside my head.
What do you think? Your comments are more than welcome.